System-wide Vim-like Movement Keys
Prologue
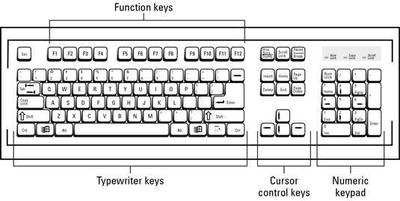
Nestled between the num-pad and the alpha-numeric section of the keyboard lies some special keys that are sometimes referred to as “cursor control keys”. They serve the purpose of controlling the view or cursor.
The view contains all of the content and the cursor. Scrolling is an action that moves the view.
The cursor (above) is the blinking line you see in a text field. It lets you know that the position it’s at is where new input will be placed.
All of the actions of moving the view and the cursor are controlled by the control keys.
A problem…
The arrow keys are too far away on a full-sized 104-key keyboard. They’re too far away from my mouse and they’re too far away from the home row. I’m not here to explain why, I’m here to complain and give a poorly thought-out solution.
I’m not a fan of taking my hands off my keyboard. I can take that further by saying that I’m not a fan of taking my fingers off the home row. I groan each time that I have to take my right hand off the home row to navigate a menu with my directional keys. My uncomfortable and awkward reaching movements to hit the down arrow with my pinky is not doing any favors for my wrist.
The bottom line is that, reaching for the control keys requires a relatively large hand movement that we can avoid.
…A solution
Using a custom keyboard symbols map, we are able to extend the English (US) keymap with some niceties.
When pressing shift you access the second level chooser, you can think of them them as the symbols above the num-keys. We can create a third level chooser with our own keymap. It’s possible to use the fourth or fifth level chooser if the third level conflicts with your native keyboard layout. The key to access the third level chooser is called the Compose key and is often tied to the AltGr key.
Many keyboards do not feature the AltGr key, we can remap Caps Lock to be our compose key instead with an xkb option: level3(caps_switch).
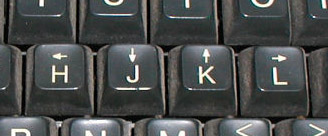
With the new symbols map and compose key remapped to Caps Lock, we can get
these extra key combinations:
| Key Combination | Action | Xkb |
|---|---|---|
| Caps Lock + H | Left | key <AC06> { [ h, H, Left ] }; |
| Caps Lock + J | Down | key <AC07> { [ j, J, Down ] }; |
| Caps Lock + K | Up | key <AC08> { [ k, K, Up ] }; |
| Caps Lock + L | Right | key <AC09> { [ l, L, Right ] }; |
| Caps Lock + A | Home | key <AC01> { [ a, A, Home ] }; |
| Caps Lock + S | Delete | key <AC03> { [ d, D, Delete ] }; |
| Caps Lock + D | BackSpace | key <AC02> { [ s, S, BackSpace ] }; |
| Caps Lock + F | End | key <AC04> { [ f, F, End ] }; |
| Caps Lock + N | Page down | key <AB06> { [ n, N, Next ] }; |
| Caps Lock + P | Page up | key <AD10> { [ p, P, Prior ] }; |
| Caps Lock + G | Menu | key <AC05> { [ g, G, Menu ] }; |
| Caps Lock + E | Escape | key <AD03> { [ e, E, Escape ] }; |
| Caps Lock + [ | Escape | key <AD11> { [ bracketleft, braceleft, Escape ] }; |
How… (Manually) Skip to Patches
1. Create the Symbols File
Create new file /usr/share/X11/xkb/symbols/vi with our symbols.
2. Update the Rule Files
Two rules files must be updated, namely:
/usr/share/X11/xkb/rules/base.lst/usr/share/X11/xkb/rules/base.xml
Next we will symlink evdev.lst and evdev.xml so we won’t have to edit both
sets of these files.
ln -sf /usr/share/X11/xkb/rules/base.xml /usr/share/X11/xkb/rules/evdev.xml
ln -sf /usr/share/X11/xkb/rules/base.lst /usr/share/X11/xkb/rules/evdev.lst
Update the XML rules
In the xml files, we need to add a <layout/> element to <layoutList/> in
both the base and evdev files.
<!-- /usr/share/X11/xkb/rules/base.xml
     ... -->
<layoutList>
  <!-- START; add the element below to layoutList -->
  <layout>
    <configItem>
      <name>vi</name>
      <shortDescription>vi</shortDescription>
      <description>English (VI)</description>
      <languageList><iso639Id>eng</iso639Id></languageList>
    </configItem>
  </layout>
  <!-- END -->
</layoutList>
Update the lst rules
In the lst files, we need to define our new keyboard layout.
These are a little less complicated.
Each section is represented with an exclamation mark!
In the /usr/share/X11/xkb/rules/base.lst files, we need to add our new
keyboard layout.
Find the ! layout section and add our new layout:
vi English (VI)
And we’re done! Pop_OS! didn’t need to be rebooted.
Patches
Luckily, we can use patches to do this for us.
XML Patch
The following patch is to make life easier by patching the XML rules files.
wget -O ~/Downloads/xkb-xml.patch 'https://gist.githubusercontent.com/michaelmob/dfff1608af185ca31af767dfa393645a/raw/xkb-xml.patch'
mv /usr/share/X11/xkb/rules/evdev.xml{,.old}
ln -sf /usr/share/X11/xkb/rules/{base,evdev}.xml
patch --dry-run /usr/share/X11/xkb/rules/base.xml < ~/Downloads/xkb-xml.patch
# Remove --dry-run to patch this system file
Aside: You can spot a little nugget of how the diff algorithm calculated this
patch. The <layout> and <configItem> lines are the same above and below the
<configItem>’s content. You can see that the diff algorithm found it more
efficient to match to the bottom-most tag pair.
lst Patch
wget -O ~/Downloads/xkb-lst.patch 'https://gist.githubusercontent.com/michaelmob/dfff1608af185ca31af767dfa393645a/raw/xkb-lst.patch'
mv /usr/share/X11/xkb/rules/evdev.lst{,.old}  # backup old evdev.lst, to evdev.lst.old
ln -sf /usr/share/X11/xkb/rules/{base,evdev}.lst
patch --dry-run /usr/share/X11/xkb/rules/base.lst < ~/Downloads/xkb-lst.patch
# Again, remove --dry-run to patch this system file
And that’s it!
We can now set our Input Source.
Set Input Source in GNOME
-
Open up GNOME Settings and head to the Keyboard section. Click the
+icon.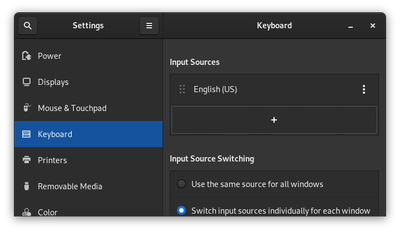
-
Select
English (United States)and scroll down to findEnglish (VI). -
Choose the entry and click
Add.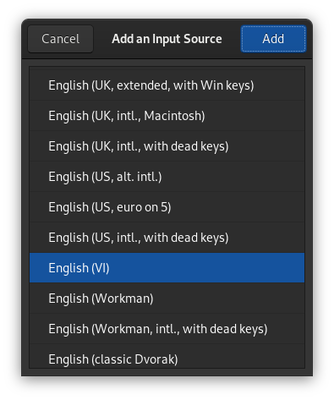
-
Change your keyboard input to
English (VI). -
Try out your new shortcuts!
More Resources
https://freedesktop.org/wiki/Software/XKeyboardConfig/Creating/